Saturday, January 8, 2011

Experimental glazing - shino

Wheel thrown small bowl, bmix clay, shino
 glaze, brushed after dipping on exterior with slate blue
 drops inside
Some glazing experiments don't turn out like you expect them to especially when using Shino glazes!  I had found in the past that brushing thick shino glazes while they dry on a pot's surface after dipping can produce an interest textured glaze.  You can see in the black areas the brushed texture on the outer surface of the bowl.  Unfortunately, the shino kind of went crazy in the kiln and pooled instead of making a smooth continuous surface - hence the crazy lava like look (which I dubbed kona bowl).  I don't know if someone would want to eat out of a bowl that looks like this but I think it is an interesting piece to look at nonetheless.  I tried some masking and different glazing with the vase below, including sponging on slate in masked areas on the vase exterior.   I like how the inside of the vase looks with the drips of kaki and slate blue contrasting the color of the fired recycled clay.  I'm thinking I'll try that again in the future.
Wheel thrown, recycled clay, reduction fired
Shino glaze with sponged slate blue in
masked areas and kaki.  Interior poured kaki
and slate blue.


Celadon bowl

Recycled clay, CuCO3 stain and celadon glaze, reduction
fired.  Wheel thrown and carved
Probably the best bowl I've thrown so far since the shape is very functional - good sized foot, thin walls with a delineated rim, profile is easy to pick up and set down, and the size is good for eating from.  I carved out the texture on the outer surface of the bowl and foot - I think I much prefer textured to smooth surfaces for aesthetics.  The dark and burgundy areas are from copper stain that I brushed before glazing over with celadon.

Thursday, December 16, 2010

Fish (casserole) bowl

Fish bowl - hand built from slabs and coils, sculpted akio
clay.  Glazed with Phila, Slate, Clear, Kaki, Woo, Toffee
and copper carbonate stain.  Brushed, dripped and sponged
on glaze, reduction fired in two pieces.  Used clay wads to
support lid during firing.
I like how this piece turned out.  The making of it was pretty spontaneous.  I made the bottom first, starting with a teardrop shaped slab of clay. I built up the shape with coils, and instead of cutting off the excess coils left them to stick out at the end.  Then I somehow got the idea to shape that clay into a fish tail and then the rest of the piece took shape.  After building the bowl, the piece was screaming for a lid.  This was kind of tricky since I had to get the lid to fit the shape of the bowl.  I made a template using a cutout from paper and used that to approximate the lid size.  I had wanted the lid to be domed in shape but that proved very difficult to do and preserve the size to fit the bottom so I decided to keep the top surface flat.  Then I made a double rim so that it would sit on top of the bowl  I had top make the rims open in order to accommodate the tail.
The glazing was pretty interesting as well.  I did not dip, spray or pour glaze.  I stained all the fin joint areas with copper carbonate and sponged on akio at the edges.  I used a bulb to drip phila stripes on the body and followed that with some white  stripes.  Then I sponged slate and akio in between the stripes to form alternating colored patterns.  I brushed woo and toffee in two directions around the head an mouth and used phila  (thick) for the lips.  The interior is mostly clear with some woo underneath.  I tried painting a white backbone on the bottom of the bowl but it didn't quite show through.

It was recommended to fire the pieces separately so that I could get them apart later, but I had to use clay wads to support the lid and prevent it from slumping in the kiln.

I don't know how functional the piece is - the bowl is actually quite small compared to the lid.

Mortar and Pestle


Mortar & Pestle - hand built from coils and
sculpted from akio clay.  Kaki and temmoku
glazed, reduction fired.
We needed a mortar & pestle for our kitchen so I decided to try making a ceramic one rather than spend $15 to buy one.  I designed the mortar by pinching and coiling a small bowl supported by a coiled ring.  The two pieces were joined when the clay was still wet.  I made the pestle buy just taking a log of clay and grasping it with my hand and fingers to make the handle ergonomically customized for my hand.  Unfortunately the clay shrinks about 10% during firing so it's not an exact fit, but close enough.  On the advice of a friend, I left the pestle tip and mortar bowl unglazed to yield a rough virgin clay surface - the akio has lots of large particles and so the rough surface is best for grinding whole spices and powders.  Overall it turned out quite good, both in form and function.  Next time I'll make one a little larger since things tend to fly out of the bowl sometimes when I'm pounding.

Thursday, December 9, 2010

Bellying out and collaring for vases

Thrown recycled clay, reduction fired,
pearl and clear poured over woo

My first bottle / vases (this piece and the patchwork vase below).  I still need to work on my sense of balance and proportion when considering the body and neck size.  This piece is too bulbous and the vase has too big of a neck.  This piece is also quite heavy since couldn't access the inside to trim away the walls - although now I realize maybe I should have trimmed from the outside, duh!   I like the glaze combinations.

SOLD - Patchwork vase and Emerald Geyser Bowl

SOLD - Patchwork Vase, thrown recycled clay,
reduction fired, kaki glaze inside, blackbird
over pearl outside, masked outside
surface and then brushed and sponged in
masked areas with various glazes.

SOLD - Emerald Geyser Bowl - Hand coiled akio clay,
 reduction fired, clear over woo inner, satin white over
blackbird outer with soda solution in masked areas (below).
I played around with masking for these 2 pieces during the glazing process, using pieces of masking tape as a resist.  This is a fun technique to try although like other aspects of working with clay, its hard to be exacting since when removing the mask, the glaze can flake off leaving a rough edge.

For the bowl, I liked the deep translucent glassy blue that was achieved in one of my previous cups by overlaying clear on woo so I tried this again at the bottom of the bowl. The look reminds me of some of the geyser pools at Yellowstone.

Sushi Tray - recycled clay, reduction fired, phila glaze poured

This is one of the first trays I made early in the fall using recycled clay.  I rolled a thinner slab so the tray has a more delicate appearance which I think I prefer.  I was hoping that the turquoise accents in the thicker areas of glaze would be more apparent, but it didn't turn out that way.  I still like this piece and am using it to hold ripening green tomatoes from late fall.

SOLD! - Sushi / Serving Trays

 I learned how to make these small ceramic trays in the fall.  They are quite fun to make.  You roll a slab of clay, imprint some texture using a plaster form, and then press the shape into a block of foam which forms the tray.  I snipped some of the corners of some of the trays.  They actually turned out ok.  I did a lot of experimenting with different glaze and stain combinations for these pieces, but all of them use some lt celadon over copper carbonate stain.  They are reduction fired, and are made with Akio clay, a really groggy clay that is full of texture.  The grog really makes the clay fun and ideal for handbuilding since it has a lot of inherent strength (doesn't slump).  I was surprised that they all sold at the PCC Holiday Sale (except for the small square dish) so I think I will try to make some more and improve on my technique.  The celadon glaze is a lot darker on Akio vs. the recycled clay.

Practicing throwing small bowls....contd

 Practice practice practice.....more bmix, reduction fired, with lt celadon and dk red underglaze.  This time used temmoku on the outside of the bowls.  It makes for a nice overlap pattern as seen in the first photo at right.  I liked trimming small feet on these bowls, although I guess this does not make for the most stable of pieces, but I think it makes it look really elegant.  I started out thinking of making some small bowls for holding baby food but now that I think about it, ceramic (breakable) bowls are probably not good to have near babies :).

The last bowl has an interesting story.  I lifted it from the drying shelf to trim, and knocked the upper shelf against the rim accidentally, creating 2 notches in the rim.  I ended up incorporating these into the bowl design - maybe for holding a utensil? I might try to incorporate this into future designs.  I like how the celadon glaze pools into the notches creating a darker contrast.
 

Set of 3 small bowls - SOLD!

 Some more small bmix bowls for practice.   I sold these as a set at the PCC Holiday Ceramics Sale, even though they weren't intended to be a set when I was making them.  They are all glazed similarly, with dk red underglaze motif, lt. celadon inside and jungle green outside.  During the process of throwing all these bowls, I really learned how to use the clay more efficiently, i.e. incorporating more of the starting clay into the piece.  I think this must be essential for professional potters not solely to prevent wasted clay, but more to conserve time and energy in making the pieces (less trimming, less corrections in throwing, smaller quantities of clay to process).

My First Sales!

Well, after 2 days of the PCC Holiday Ceramics Sale, I ended up selling 12 pieces!  Its comforting to know that people are willing to pay for my work.  It was also educational since I have a better idea now of what sells and what doesn't.  I will update my blog with the remainder of my pieces, including which ones have sold.

Tuesday, December 7, 2010

Bowl Series I

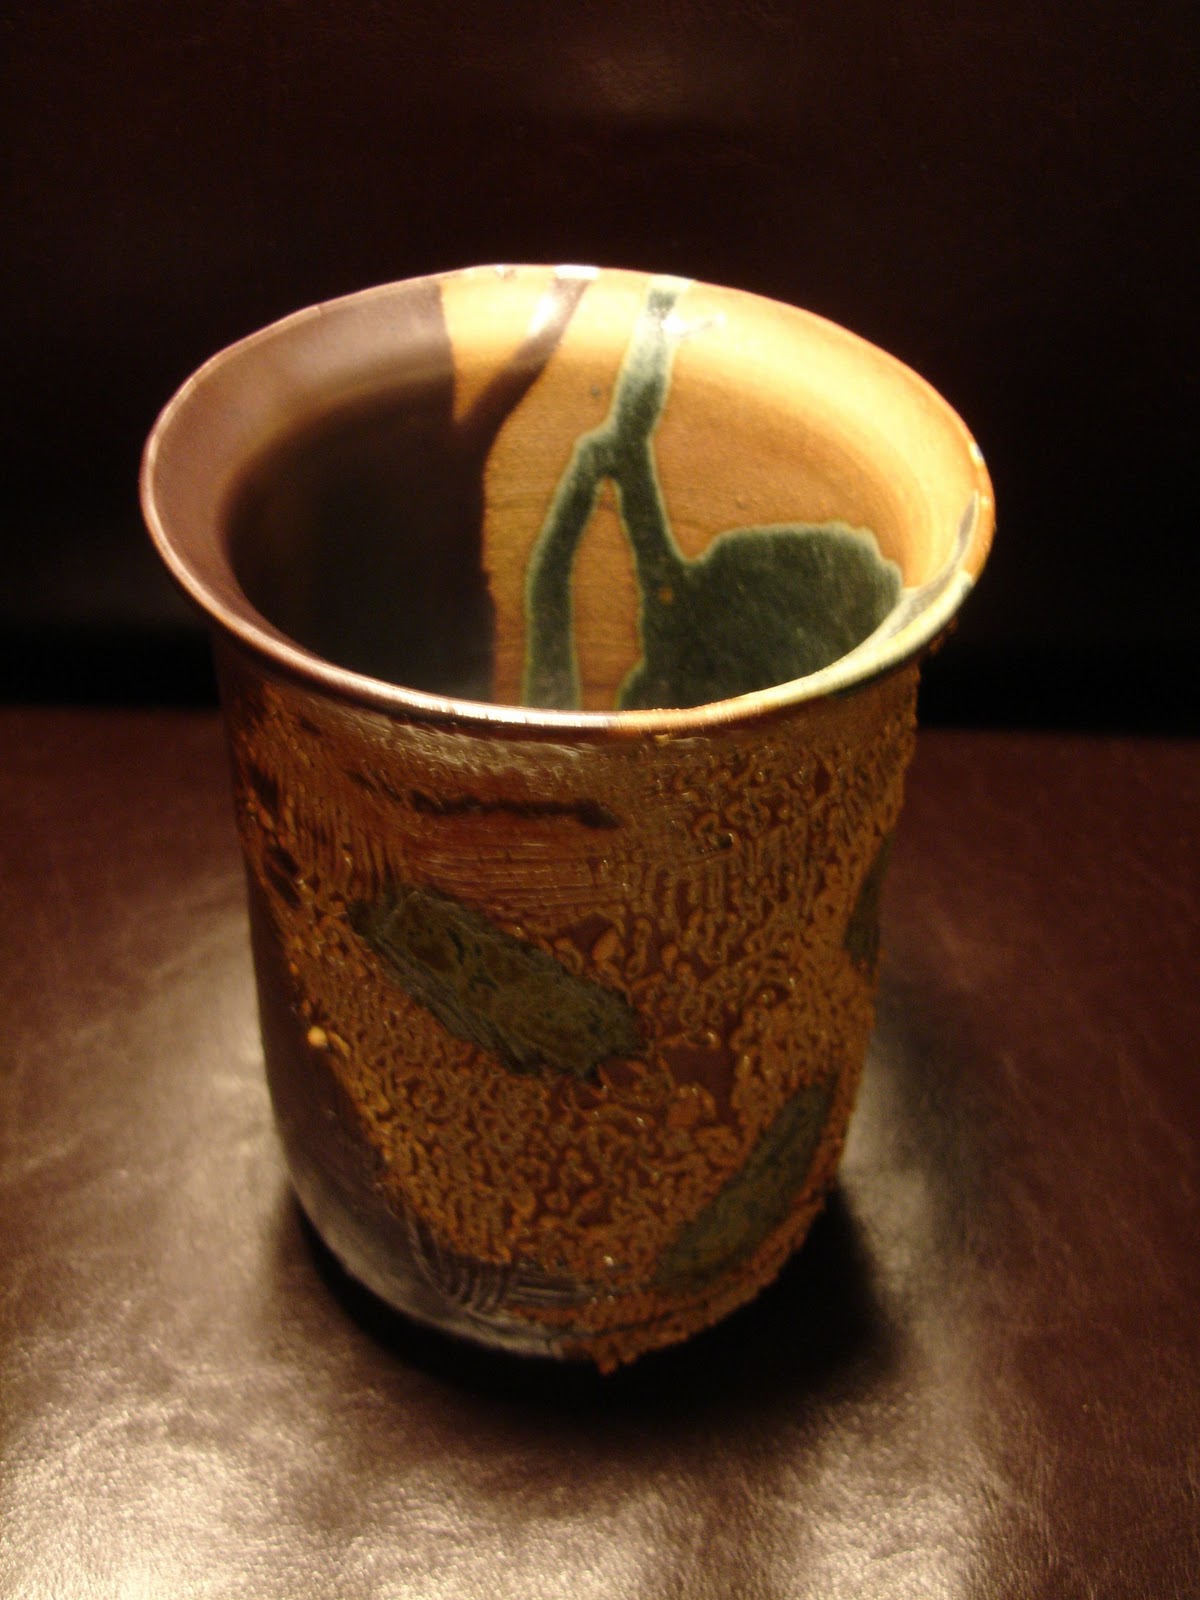
Wheel thrown, B-Mix, Reduction Fired, Dipped
 half bermuda half lt. celadon, dk red underglaze motif

Kona Bowl (top), Wheel thrown b-mix clay, reduction fired

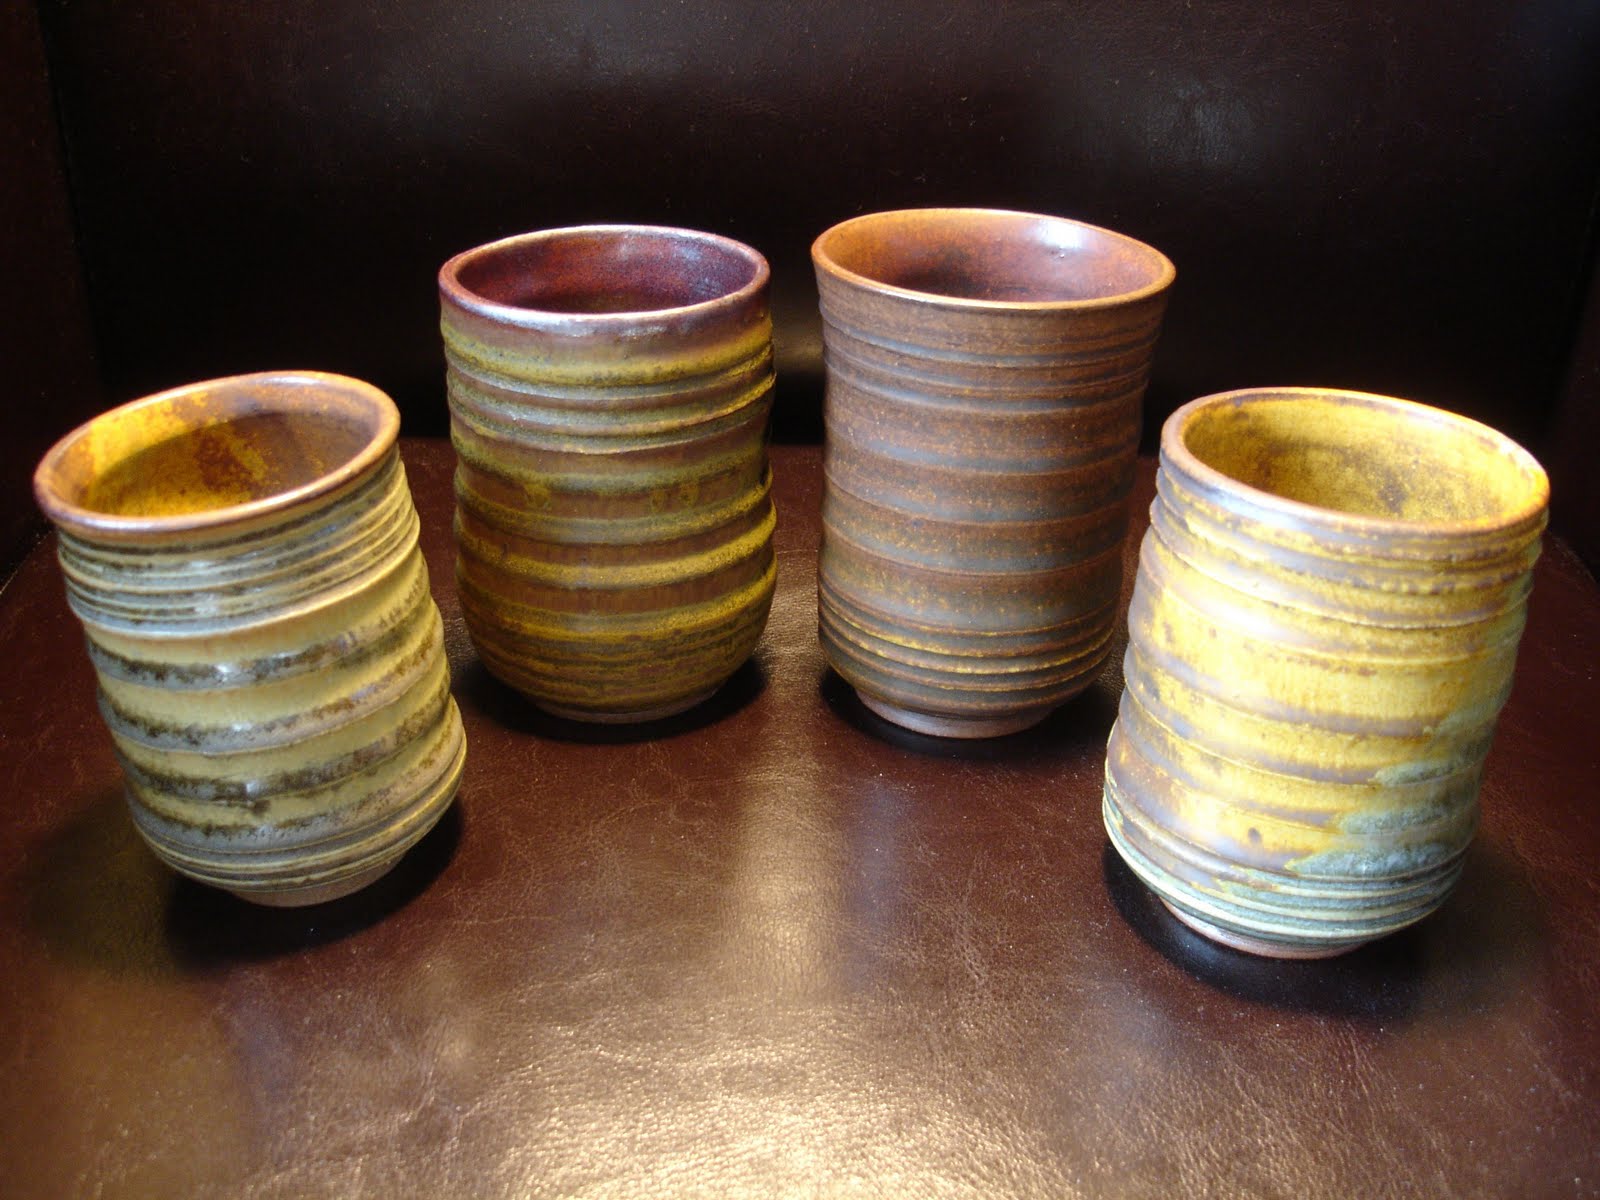
 I started throwing a bunch of bowls 2nd semester to practice generating smooth continuous curved walls.  This starts with centering a low wide disc of clay and then opening up a shallow curved depression, pulling the walls outward and upward simultaneously.  These bowls were made using about 1lb of clay.  I made several different shapes of bowls and really got a lot of good practice turning foots and creating surface textures.  Because B-mix has no grog, the turning is really smooth and nice.  I like the way the 2 transparent glazes overlap, as well as the purplish tones in the blue bermuda glaze.


I think I must have knocked this bowl during transport since its got some dents in the rim.  I glazed the bowl with MD shino which made this interesting textured surface in the inside surface.  During firing, some slate must have dripped from a nearby piece in the kiln, but it made a great accent.  The outside of the bowl has a layer of temmoku over the shino.

Below I used a loop tool to carve concentric concave grooves in the side of the bowl right down to the foot.  It made for a really elegant bowl.  Unfortunately some of that quality was lost after glazing and firing.  I probably should have used a lighter more transparent glaze.


Kona bowl (side) - Temmoku over MD shino outer,
MD Shino with Slate drip inner
(side) Wheel thrown B-mix, turned concave grooves using
 loop tool with concave foot groove

Temmoku with temmoku drip inner, clear over temmoku outer

Wednesday, November 24, 2010

2 vases, recycled clay. Thrown, carved. Reduction fired


These two small vases were thrown from recycled clay, bellied out when wet.  I added some faceting to the top vase after bellying out and carved into the surface beforehand.  Glazing used Phila / woo yellow on the upper vase and cream rust / sky celadon on the lower.  Some Phila ended up dripping into the interior of the top vase, creating a nice turquouse water fall into the vase.  I think both Phila and Woo yellow look great in reduction - kind of aged  and weathered with a lot of depth and texture to the color.

Ride On - tile set, carved bmix slabs, Cream Rust glaze, wiped off thinly


I made a tile / coaster set using a bicyle-themed motif that I designed.  It was intended as a set of 6 coasters and a box, but I forgot about shrinkage during firing, and so the box ended up being too small.  Now I use it as a business card holder.  I rolled and cut 1/4" slabs from BMIX clay and then carved into them for the motif; aslo imprinted bicycles using a plastic pin that I had.  The glaze is Cream Rust, wiped off thinly and reduction fired.  The glaze is actually a swirly blue color when thick, but turns this rusty metallic color when thin.  For the box, I stained the recessed areas with Copper Carbonate which yielded the blackened matte areas.  The cream rust glaze actually brightens and becomes a glossy golden color some areas where it breaks over edges which is kind of interesting.

Tiles, BMIX, stamped with cardboard template. Brushed with 2 layers of glaze, Reduction fired. Iron oxide stain on underside

I made some nice tiles in the Fall - the design was inspired by a set of silicon rubber coasters we have - I took the basic design and used wavy lines instead of straight clean contemporary lines - its hard to preserve that look precisely in clay! I cut out a cardboard template of the pattern and pressed it into cut slabs (tiles) of soft clay. Because the cardboard absorbed moisture from the clay, the templace got flimsy and so the imparted pattern also has a wavy texture and is not completely flat - this actually ended up complementing the wavy linear pattern! I dipped the tiles in one glaze and then brushed on a second glaze in the raised areas for contrast. The glaze combinations are Shop Shino / Green Crystal; Woo / Green Crystal; Temmoku ; Satin White; Satin White / Temmoku; Slate Blue / Red Rasberry. I've added some foam pieces to the underside so that they can be used as trivets or coasters.

Thrown family of cups, surface altered. Recycled clay, reduction fired, various glazes

These are my current favorites of all the pieces I have made! I tried again to make a set of 4 identical cups, using just over 1lb of recycled clay for each. Unfortunately, while throwing some of the cups, I had to remove some of the clay from the rim because the walls weren't even. Anyhow, I added the grooves on the wheel by hand using fingers and the thinner grooves using rib, while the clay was still wet. This made the inner walls of the cup wavy so I used ribs to smooth those out again as best I could. For glazing I played around with layering referencing some of the test bowls in the studio - from left right, pearl / woo; woo / temmoku, woo/toffee, clear / woo. During this semester, I've improved my turning skills a lot too with all the practice so these cups all have pretty nice feet. Also I find that I don't waste nearly as much clay while throwing as I used to, which is more efficient.

Thrown and carved mugs. Recycled clay, reduction fired Phila and toffee glaze

During the 2nd semester, my throwing skills improved a lot. Here I tried to throw two identical cups from about 1.25lbs of recycled clay. In the picture they look close, but actually one is fatter and one is skinnier - I call them the brother and sister cups (I won't say which is the fatter one). I decided to do some carving again (I find smooth surfaces boring I guess). Originally I had taken a grooved metal rib and tried putting concentric grooves on the entire outer surface but I didn't like that look because there were lots of clay burrs and it wasn't smooth or modern looking, just messy. So then I smoothed out the grooves by hand and just used the grooved rib to score grouped hash marks in the side of the cup. Then I turned some grooves on the wheel above and below the hash marks. During glazing I dipped the cups in Phila, I should have put a thicker coat on since the turquoise/blue is not very bold.

Pinched pods, shaped and carved. Reduction fired temmoku with clear and green over iron oxide stain. Recycled clay


I started off the 2nd semester doing some handbuilding. I built a wedging table so I could do some stuff at home in the garage. These two pieces are pods, made by joining two pinched pots together, and then shaping and carving out the holes. The shape and surface designs came about spontaneously as I was making the pieces. I wanted the holes and designs to give the pods a different aesthetic and light play from all the different angles from which the pieces are viewed.

Slab rolled recycled vase, with BCS-6 inlays. Burnished and glazed with light celadon and blackbird stripes

This is the first handbuilt piece that I made - I rolled a slab of recycled clay, inlaid with strips of BCS-6, then used a shipping tube as a form to make the cylinder, and joined it to a base. It was quite fast and easy! The inlays make for an interesting aesthetic. To contrast, I added some vertical BlackBird stripes by first dipping the vase in Lt. Celadon, and then waxing the outer surface. I carved out the vertical lines and then brushed in with blackbird. I read about this technique in a book so wanted to try it out. Its a good way to incorporate some fine detailing using glazes.

Shellacked tilework. Recycled and BCS Clay, various glazes. Oxidation Fired

We learned about using shellac for creating resists and textures in class so I did some experimenting with shellacking some Chinese characters on tiles - because of my poor brush skills and the thick shellac, the writing is not very pretty, but the technique is kind of fun. The bottom two tiles (Front Door and Exit) are BMIX clay, with Breaking Green Glaze over Brown. Upper left is dk yellow underglaze with glossy clear over (waxed), then dipped in Red Rasberry. Middle is Clear + Wax, then dipped in Wedgewood blue. Right is green glaze + wax, then dipped in brown. Top tiles are all recycled clay.